What is LAMP/LEMP?
LEMP is a variation of the ubiquitous LAMP stack used for developing and deploying web applications. Traditionally, LAMP consists of Linux, Apache, MySQL, and PHP. Due to its modular nature, the components can easily be swapped out. With LEMP, Apache is replaced with the lightweight yet powerful Nginx.
We are going to teach you how to have the best Host for your WordPress/CMS website which is very fast and stable.
Linx – Use Centos 8
First of all, you need a Linux server which you can connect to it through SSH, we are highly recommend using Centos for this tutorial which is more stable and fast.
You can simply use Putty to connect to your Centos server, and the first thing you need to make sure you are updated, you can Update Centos with the below command :
sudo dnf update -y
dnf install nano -y
You can also use yum instead of using dnf , but on centos 8 its better to use the dnf , if you are using Centos 7 then replace dnf with yum
Step 1 – install Nginx
sudo dnf install nginx -ysudo systemctl enable nginx
sudo systemctl start nginx– FireWall Rules
sudo firewall-cmd --zone=public --permanent --add-service=http
sudo firewall-cmd --zone=public --permanent --add-service=https
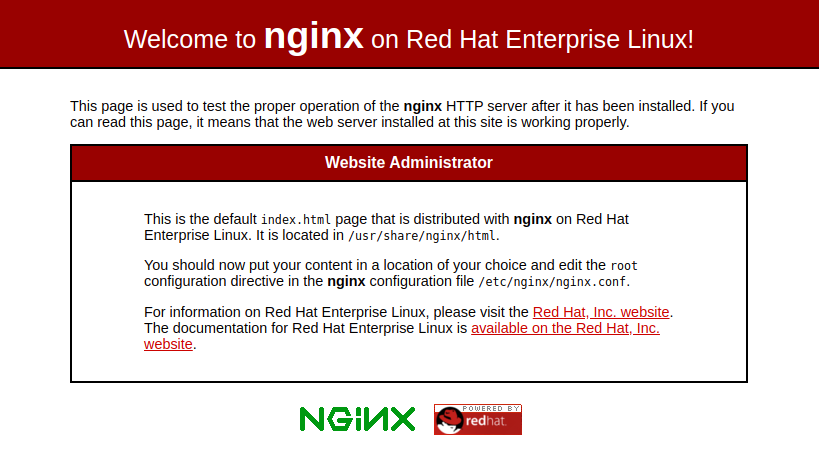
sudo firewall-cmd --reloadafter you set firewall rules, now if you open your IP on your browser you will see below image:
Step 2 – install PHP 7.4
By default, Centos Installs PHP version 7.2 so we need to be more updated version lets go to install PHP 7.4
First, install Epel on Centos :
sudo dnf install epel-releaseThen installing Remi
The Remi repository contains the latest PHP packages for the CentOS 8 Linux system. So first of all, you need to add the REMI repository to your system. Just execute the following command to add the repository.
sudo dnf install dnf-utils http://rpms.remirepo.net/enterprise/remi-release-8.rpmThen enable the required DNF module for PHP installation. Here we are enabling the module for installing PHP 7.4. You can change this to PHP 7.3 or PHP 7.2 as per your requirements.
PHP 7.4
if your want to install PHP 7.4 just enter the below command :
sudo dnf module reset php
sudo dnf module enable php:remi-7.4
PHP 8.0
if your want to install PHP 8.0 just enter the below command :
sudo dnf module reset php
sudo dnf module enable php:remi-8.0
sudo dnf updateEverything is set and we chose PHP 7.4 as the default PHP version so let’s install PHP with all useful libraries :
dnf install php php-cli php-fpm php-mysql php-mysqlnd php-common php-iconv php-curl php-mbstring php-xmlrpc php-opcache php-soap php-zip php-gd php-xml php-intl php-json graphviz aspell ghostscript -ysudo systemctl enable php-fpm
sudo systemctl start php-fpm– Configure PHP with Nginx
At this step, you have installed all the required packages. Let’s start the configuration process. First, edit the PHP-FPM configuration file:
sudo nano /etc/php-fpm.d/www.conflocate these two lines:
user = apache
group = apache
Now change both values to Nginx:
user = nginx
group = nginx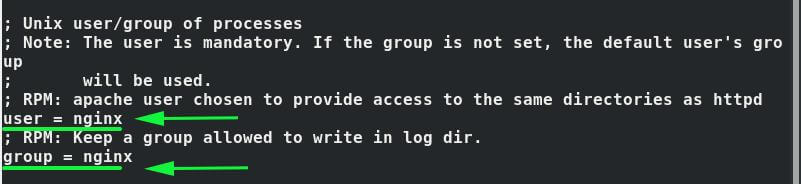
Save and exit the configuration file. You can do that with ctrl + x
Then restart Nginx and PHP-FPM for the changes to come into effect.
sudo systemctl restart nginx
sudo systemctl restart php-fpm
You can test Your PHP to see if its working or not, by default you can go to this directory /usr/share/nginx/html/ to change default file of nginx :
cd /usr/share/nginx/html/and then add a test.php file there :
nano test.phpAdd the below lines and save the file :
<?php
 phpinfo();
?>
Save and exit the file.
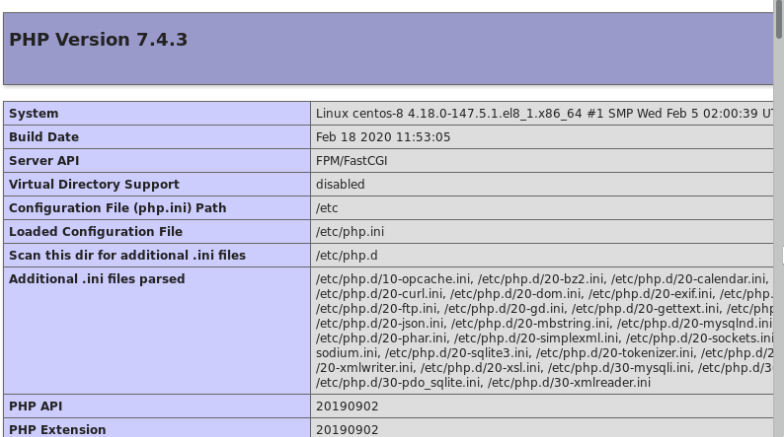
Launch your browser, and in the URL bar, type your web server’s IP address as shown.
http://server-ip-address/test.phpYou will see the below picture:
Step 3 – Install MariaDB on CentOS 8
MariaDB Server is one of the most popular open-source relational databases.
To install MariaDB, run the command.
sudo dnf install mariadb-server mariadb -ysudo systemctl enable mariadb
sudo systemctl start mariadbMariaDB database engine is insecure and anyone can log in without credentials. To harden MariaDB and secure it to minimize chances of unauthorized access, run the command.
sudo mysql_secure_installationWhat follows is a series of prompts. The first one requires you to set a root password. Hit ENTER and type Y for Yes to specify the root password.
** Be careful you will need this root password later for connecting to your database **
Once you’ve completed all the steps, you can log in to the MariaDB server and check the MariaDB server version info (provide the password you specified when securing the server).
mysql -u root -pAnd enter your password then connect to the terminal of your database
you have now install LEMP successfully In the next tutorial we will show you how to set everything to install your CMS like WordPress and optimize everything.
Install WordPress on LEMP :
Comment and ask your question if you have any.

How to host a website ?
you can install everything as tutorial and then upload files of your website at this directory :
/usr/share/nginx/html/in the next tutorial we will teach how to create database and installing everything